Sometimes the luck just holds. Well this time anyway. If you wander back through my blog or find my post on M95 april 2012. The avid nova watchers will remember the eruption in M95 sn2012aw. This happened just as I started at work a set of nights. We only do 2 sets a year and could not believe my misfortune in having to work when the skies were clear. Now go back a little futher to sept 2011 and sn 2011fe in M101. We were about to move and I had dismantled the observatory in preparation.
But not this time fellow bloggers. I had imaged m82 back in Oct testing out my new kit (left pic) and the wow amazing sn 2014J captured just last night 1 day after it's discovery. I am sure at this moment they are searching through Hubble archives to find the progenitor. We know already it is a type 1a and a few theories exist as to the fate of this white dwarf star.
Anyway here is my pic.
I am trying to do a blink comparison aswell. I will post it if I manage it. Any advice would be appreciated.
Friday, 24 January 2014
Sunday, 12 January 2014
The Horsehead Nebula.
With a magnitude -11.8 moon causing a little concern. I thought I would have a play. I have imaged the Horsehead a few times before so I was not banking on a perfect image. I must admit though I am again impressed with the sensitivity of the camera and scope. I captured 3 hours in 20 minute sub frames.
Processed in photoshop only using levels & curves. An unsharp mask & high pass filter has done wonders on the dusty stuff & blended using layer masks. A subtle saturationboost and noise filter applied to complete.
Thursday, 2 January 2014
Imaging the Califoria Nebula @f7
Whilst waiting for the Rosette to be clear of a tree the other night I had a play and took 3x 20 minute exposures of the California nebula. I have imaged this object before with the old set up imaging at @4.96 focal length of 446mm I was achieving a lovely wide field image encompassing the whole of the nebula. The new system is not as fast with the FLT110. Even with the dedicated TMB field flattener there is no reduction in the focal lenth so I now image at f7 at 770mm. So I just wanted to post 2 pics from the old system to the new. I had initial concerns over exposure length with the increase in focal ratio but my concerns were soon dissipated with the sensitivity of the new camera. I will of course need to mosaic a few of the larger targets. I cant wait to post some results.
Addendum
I have been learning a few new processing techniques Below is an update to the above to include a selective unsharp mask anda high pass filter. An amazing difference for 1 hours worth of exposure.
Wednesday, 1 January 2014
Rosette 8 Hours
Rosette Nebula
Monday, 30 December 2013
A work in progress
As per my previous post I had a second night of beautiful clear skies. I had a few issues with plate solving though. Loaded a previous nights frame and solved it. asked the scope to goto and it was out by over a degree???? Some manual moves to frame it gave me an opportunity to gather another 3 hours of data. I have had several processing attempts. Some of which are posted here. Before christmas I spent some time with Mark Casto http://astrocasto.blogspot.co.uk/ where I learned and brushed up on a few Photoshop processes.
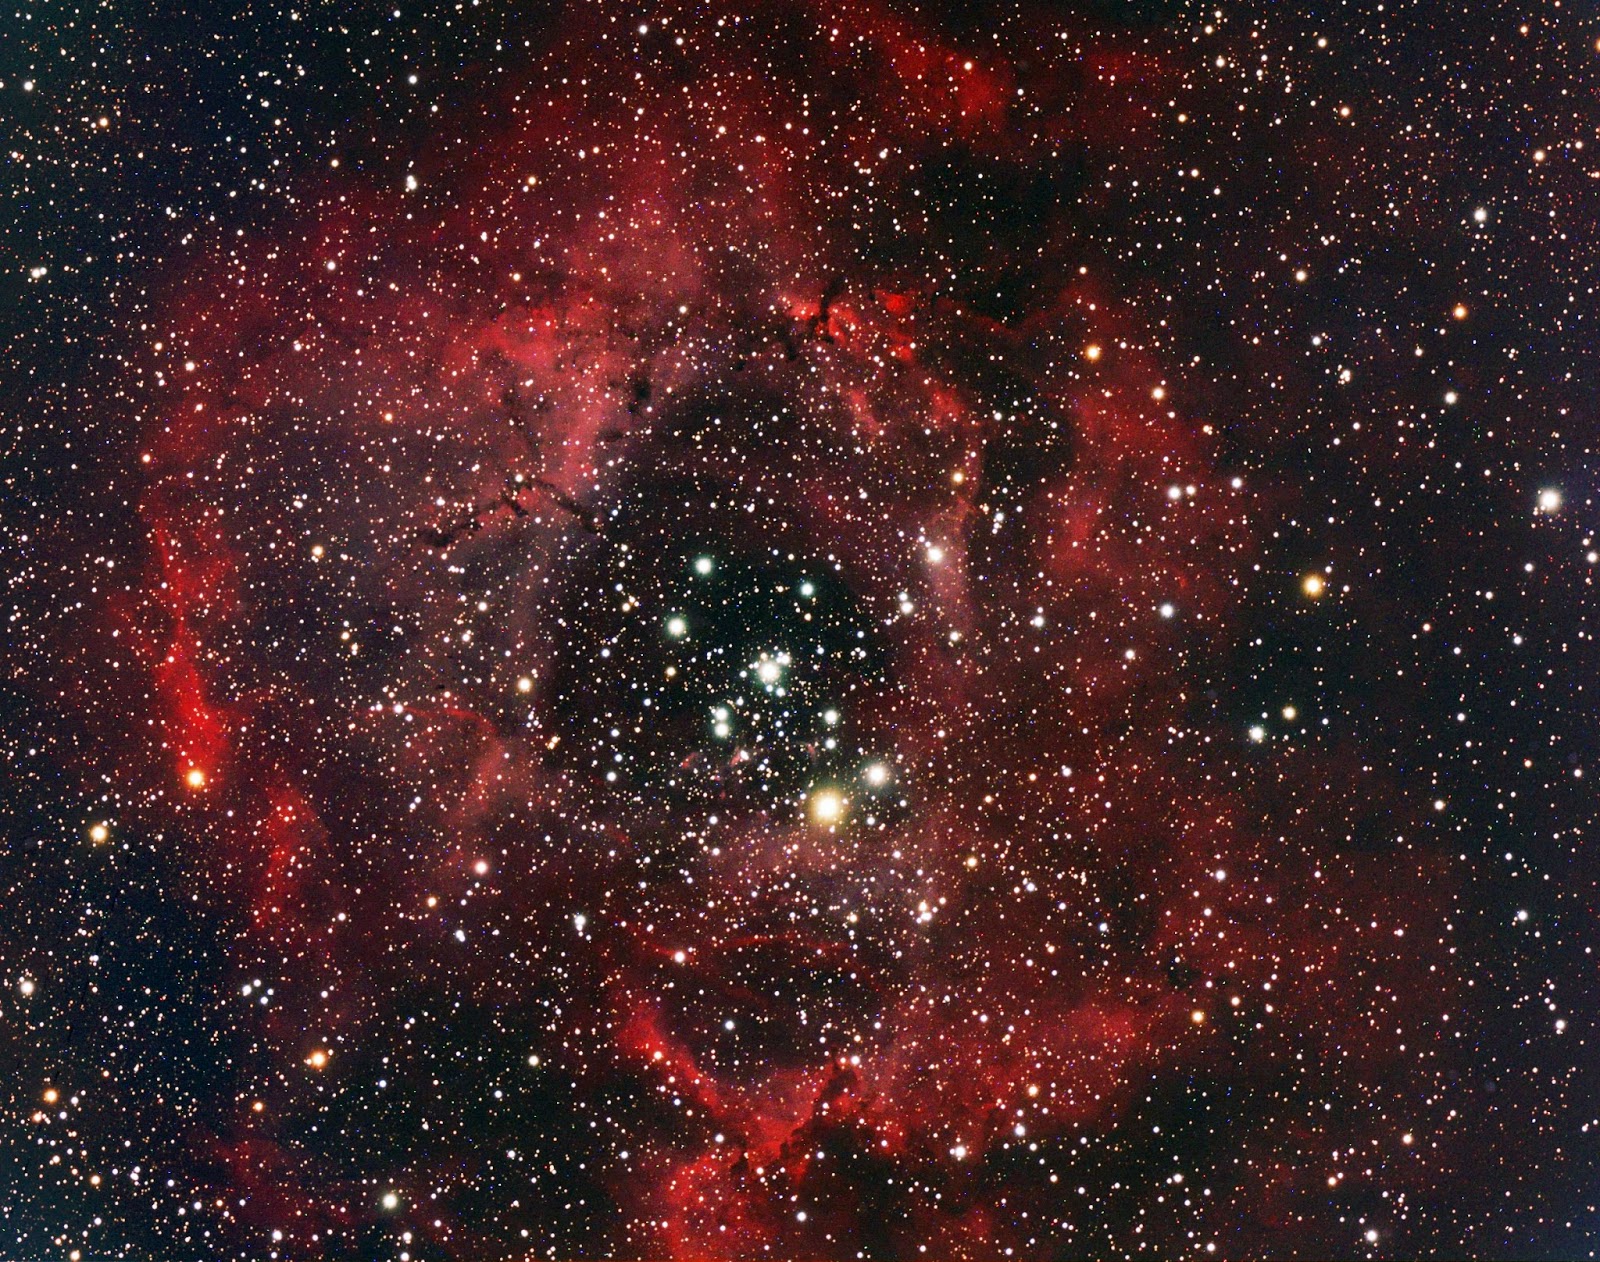
From these images you can see I have enjoyed having a play. First image was a 2 hour process with flats removed and processed to highlight the dark dust lanes. Very pleased with the focus and flat image that the new spacers provide. I especially like the subtle wispy tendrils. 10 minute subs were used. Sometimes underprocessing brings out more details.
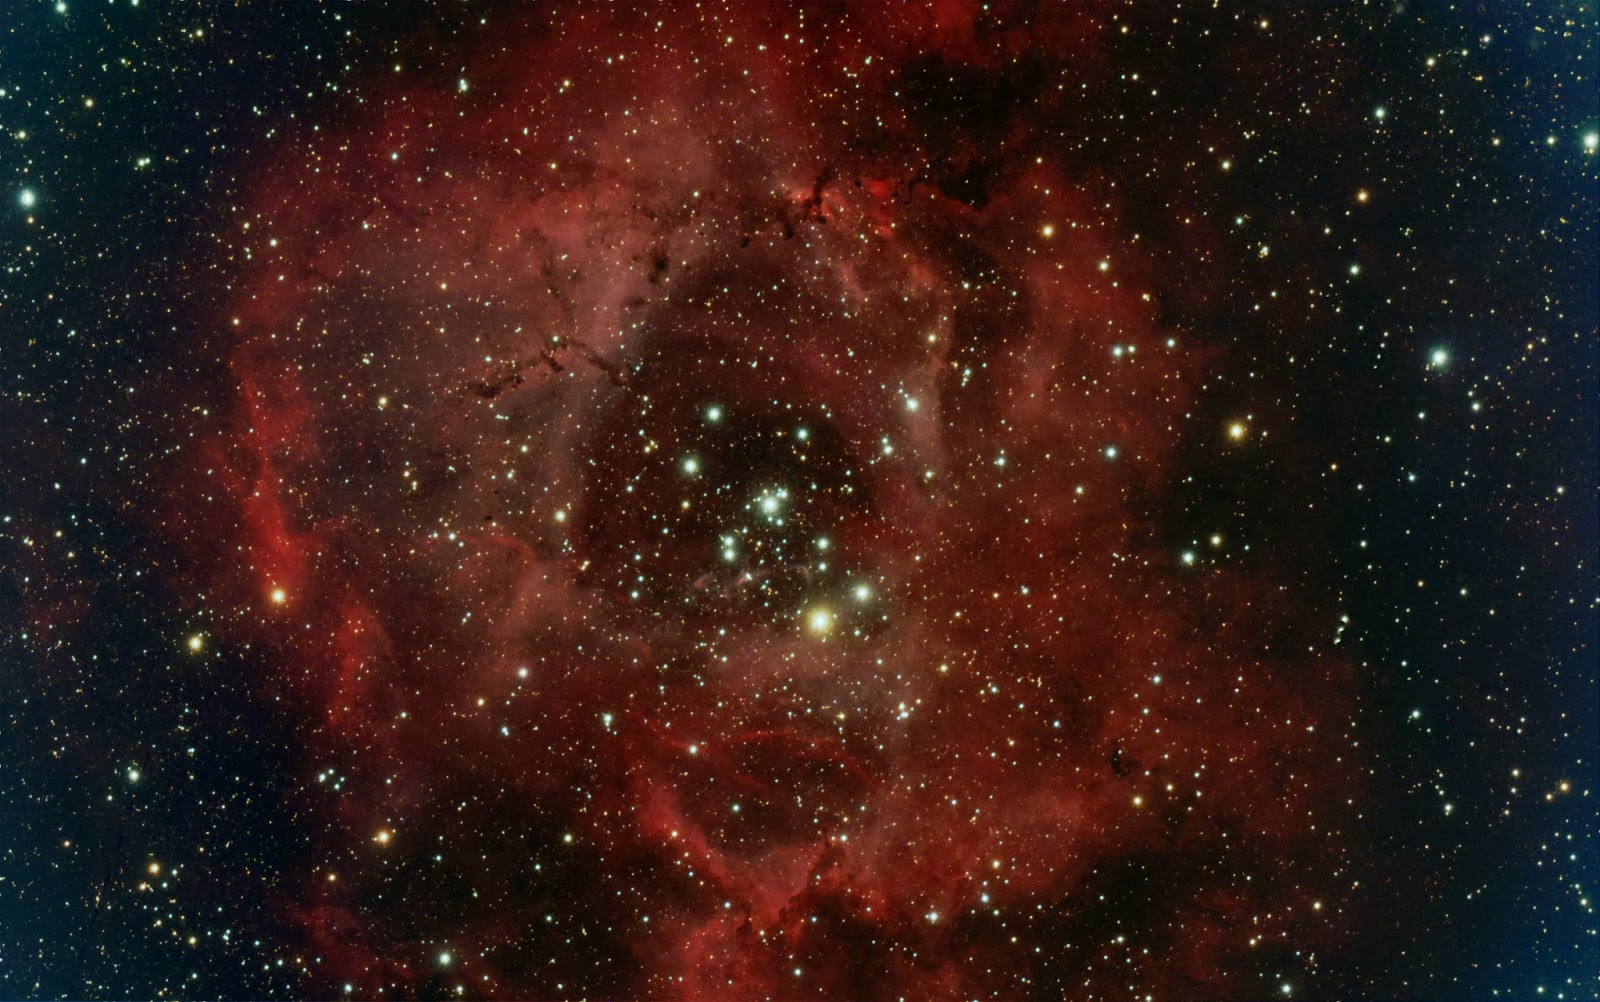
process concentrating on keeping the colours as natural as possible without clipping the bottom end. 5 hours of data provide a smoother image. A little more to do with the background colour. A big learning curve here as this is the first time I have used photoshop to process an image. I am very happy with the progress made so far.
The final image here is a combination of the 2 leaving the dark dust more prominent. I like the way the outer edges are a striking red from the internal pink, colour correction to maintain star colour. Finally I used a what appears to be an aggressive kernel filter to remove some intensity from the stars. It has clipped the bottom end but I like the way it has removed some stars thus focus the eye on the nebulosity. Beauty is of cousre in the eye of the beholder And the point of this post was to show differences in processing on different areas of the image. As per usual the weather has closed in again and I see in the forecast a week of rain. I would like a few more hours in here before it is complete, but I do think I am on the way to a very pleasing image. Tell me what you think fellow bloggers.
Saturday, 28 December 2013
Winter Project. Rosette Nebula.
This is a processd image from last night. 2 Hours worth of data in 10 minute subs. I would like to collect at least 6-8 hours plus calibration frames. No calibration frames taken as yet.
I see the way I would like this post to pan out showing a 2, 4, 6 hour image then a fianl calibrated processed pic to complete. But as we all know weather here is a shocker and this is the first real attempt in approx 6 weeks. We will see how this progresses and I will of course keep you all posted.
I now have my own set of T2 spacers and completed the set up last night, with CCD inspector showing a very flat field with even focus throughout. The biggest defect I can see here is the need for a flat field.
Even though the wind was swirly outside the dome the guiding graph showed no errors in the 2 hours taken. Although expected I am very impressed with the Ha sensitivity of the camera a huge difference between the un modded Canon 40D. It will be fun to go through targets imaged over the last couple of years and see the differences.
Sunday, 1 December 2013
Comet Ison Animation
Before Comet Ison drove himself headlong to a fiery destruction. I captured these images on the morning of the 28th Oct. travveling at 115 thousand mph. 30x 2 minute exposures .
Sunday, 17 November 2013
Flat field issues solved
I am still in the early stages of getting used to the new set up. With the old system I attatched the field flattener and DSLR and the correct ccd to lens distance was achieved instantly giving full flat frames. The same applied to the FLT110 and the DSLR good round stars to the edge of the field but with the Starlight express camera elongation of the edge of frame stars was noticable. I downloaded CCD inspector to examine the field.
This process was done late evening after returning from the observatory at Great Ellingham. I wanted to give it a test run on a subject until the rise of the comets. I ended with a nice result from 12 x 10 minute exposures on the enigmatic M42. A DDP stretch and saturation gave a good sharp result with lovely structure to the wisps of nebolosity. Guiding was sub pixel accurate.
As you can see a clear problem. I didnt have any m48 spacers, thankfully Andrew ( a fellow blogger and member of BAS) has lent me some. A few combinations later and 35mm worth of spacing has produced a much more pleasing result. Good focus and FWHM figures from centre to edge.
This process was done late evening after returning from the observatory at Great Ellingham. I wanted to give it a test run on a subject until the rise of the comets. I ended with a nice result from 12 x 10 minute exposures on the enigmatic M42. A DDP stretch and saturation gave a good sharp result with lovely structure to the wisps of nebolosity. Guiding was sub pixel accurate.
Comet Fever
Comet fever is sweeping the globe, as we anticipate the arrival of comet Ison. I imaged Ison on the 13th at 05.00. I estimated the magnitude at approx 7.5 still just beyond visual limits. A few cloudy early mornings later it appears we have some excitement. As I write this there are posts on facebook claiming he is upto 5.5 and withing viusal limits. The dawn sky was lightening at pace as I tried 3 minute exposures with the Sxv M25. I also captured comet Lovejoy higher in the sky and captured earlier starting at 02.30. These images were produced by the comet stacking and star blurring in Deep Sky Stacker. A strange result with no elongated stars at all ??? I tried with the 3rd method of what would be double processing on the comet then the stars and recombining the to give a sharp core and stars image. This worked but I lost all the colour????. If you looka carefully there is some structure in the tail of Ison.
I wanted to post something from what was an all night session. I will have another go with them and also want to create an animation for them both too. Watch this space.
Comet C/2012 S1) Ison Comet C/2013 R1) Lovejoy
I wanted to post something from what was an all night session. I will have another go with them and also want to create an animation for them both too. Watch this space.
Comet C/2012 S1) Ison Comet C/2013 R1) Lovejoy
Sunday, 3 November 2013
5 hours processed M81,M82
I am getting to grips with the Starlight Express camera from using the DSLR. This is the first time I have captured 5 hours worth of data. Registered in Maxim DL and processed in Images plus. (Pixinsight trial ended the other day). I know I will revit the processing workflow for this one but here it is at present.
B33 Dark Nebula. The Horsehead.
2 hours worth of data here. still not happy with the gradient in the centre.
Subscribe to:
Posts (Atom)
Comet Tsuchinshan-ATLAS, C/2023 A3 , Comet A3,
A cosmic wanderer, Comet Tsuchinshan-Atlas or more commonly known as Comet A3 has traced its elliptical path through the solar system, a j...

-
Object: M45Type: Open Cluster Distance: 380Light Years (Approx) Constellation: Taurus Date : 27th October 08 Equipment: William Optics M...
-
A cosmic wanderer, Comet Tsuchinshan-Atlas or more commonly known as Comet A3 has traced its elliptical path through the solar system, a j...