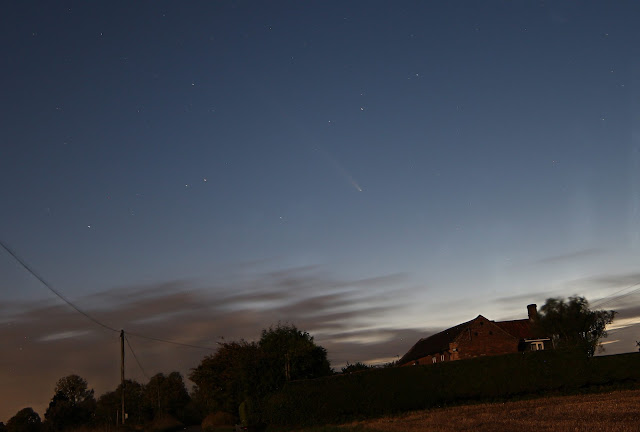
Malc's Astro Page
A view into my world of astronomy and astrophotography
Thursday, 1 March 2012
Wednesday, 29 February 2012
Double the distance
In this image nestling in the maidens arms lie about a dozen galaxies. Starting with M90 upper left. The huge elliptical M89 to its right and lower down right centre The stunning M58 all lying between 50 to 68 million light years away that's about double what the previous image of M95. I think I am going to need a new set of dark frames. I seem to have things right at the moment and was able to grab 5 minute autoguided exposures at Iso 800.
Thursday, 23 February 2012
Galaxies here, there, everywhere
Comet 2009 P1 Garrad
I had a great night Saturday night. Typical thought just had a week off for half term. and I have to return to work on Sunday so It's up at 6.00 ish. I finally rolled closed the roof at 02.30 and into bed by 02.45. I found it difficult to sleep as all I could see was the lovely comet Garrad. I swear I could almost see it moving in the eyepiece. It certainly did move over a period of an hour. I used Deep Sky Stacker to stack comet and stars. So there is a bit of noise present. None the less I just love the 2 tails. It was almost 3D looking at it through a 25mm 2" eyepiece on the 90mm refractor. So a stack of about 47 Minutes Iso1600. No dark calibration. Just a ddp stretch and a colour boost.
Labels:
Comet 2001 P1 Garrad,
Comet stacking,
Comets,
Deep Sky Stacker
Sunday, 12 February 2012
80 Million Light years away.
My first night outside in nearly a month. Keeping an eye on the forecast, looked like Norwich would cloud over around midnight. I wanted a galaxy group in Virgo that were still low on the horizon unfortunatly they would be up too late to get a couple of hours worth of photons. So I spun the mouse over stellarium and it settled near a couple of little round hoops in Leo. A quick goto and I had settled upon a trio of fuzzies. Beyond reach optically on my 90mm refractor, but a minute test image at 3200 Iso revealed a mist in the centre of the frame. I set up a run of 2 minute guided exposures and returned inside. -10 in the garden was a little to harsh to want to stay outside.
This just over 1degree image shows you a galactic trio of NGC2964(Upper right), NGC2968(centre) and NGC 2970 (Lower Left) with an interval of 6 arc minutes at the northern part of Leo's head. A righthand spiral is NGC2964, has a long axis of about 3 arc minutes and 12th magnitude in brightness at a distance of 72 Million Light Years. And to its left is the irregular galaxy of NGC2968. You can just make out the eliptical galaxy to its left again Mag 14.5 NGC 2970 Both galaxies are about 80 millions light years away and have interacted in the distant past.
Wednesday, 8 February 2012
Runaway Horses
Labels:
Alnitak,
B33,
Canon EOS40D,
Flame Nebula,
Horsehead
Tuesday, 17 January 2012
Horsehead Nebula
Stargazing Live from my own back garden this evening. My telescope & camera pointing towards the heavens to image the amazing Horsehead Nebula.
The red glow originates from hydrogen gas predominantly behind the nebula, ionized by the nearby bright star Sigma Orionis. The darkness of the Horsehead is caused mostly by thick dust, although the lower part of the Horsehead's neck casts a shadow to the left. Streams of gas leaving the nebula are funneled by a strong magnetic field. Bright spots in the Horsehead Nebula's base are young stars just in the process of forming.
1 hour only of exposure Approx 40 mins @ Iso 3200 and 20 Mins @Iso 1600 using 2 minute guided sub frames. My collection of darks are proving useful with a dark frame subtraction. DDP and levels adjustment and aquisition provided from images plus and Deep sky stacker combining the frames.
Labels:
B33,
Canon EOS40D,
Flame Nebula,
Horsehead,
IC434,
Images Plus,
NGC2024
Friday, 6 January 2012
M42
The last week or so has left us all a bit battered by the winds.
The moons phase equally annoying for a deep sky imager. I wanted to just test everything was still working as it has been over a month since rolling back the dome roof. Last year I was able to test my UHC filter on ngc7000 on a series with and without. So last night I pointed towards Orion and done a series of 3 minute images at Iso 800. I love the colour rendition that the filter gives. A more natural look from unfiltered. M42 I think. Just wish we were a few light years closer!!!!!!!
Labels:
Canon EOS40D,
M42,
UHC Filter
Tuesday, 29 November 2011
M38
Sunday night saw a few hours free from the winds thats been hounding us Brits.
So I took the opportunity to look East. M38 (NGC 1912) is a lovely target with plenty to fill the field of view.
M38 (left of centre) as you know lies approx 4200 light years away in the constellation of Auriga the Charioteer.
Dead centre in my image is NGC1907 about 4700 light years distant. Above and to the right is IC 417 a faint patch of Hydrogen gas spawning a new cluster. Down and right towards the right corner of the image is another fuzzy NGC1931 also known as the small Orion nebula, again a region of starbirth illuminating the surrounding dust and gasses.
The image was taken last sunday approx 60 x 1 minute unguided exposures at ISO1600 No darks or flats taken. The library is steadily building, and stacked in deep sky stacker. A little DDP stretch later and a few pretty star spikes has produced I think a pleasing wide field image to add to the collection.
Orions Belt
I am happy I was able to capture all 3 stars of Orions belt.
On the left ζ Ori (Alnitak) 800 light years away and 100,000 brighter than our sun.
In the centre ε Ori (Alnilam) 1340 light years and 375,000 times brighter than our sun.
On the right lies Mintaka a mere 915 light years away and just 90,000
times brighter than the sun.
Mintaka is also a double star and takes
less than 6 days to orbit around each other.
This is a 45 minute exposure at Iso 800 on my Canon 40d
Labels:
Orion
Monday, 21 November 2011
Thank you Visitor 5000
Have a glance to the right and check if you are visitor 5000 to my Astro blog. If it's you say hello and tell me where you are blogging from.
Thank you to all my visitors and I look foward to posting lots of new pics
Malcolm
Thank you to all my visitors and I look foward to posting lots of new pics
Malcolm
Sunday, 20 November 2011
La Luna

At a mere 241,390 miles our nearest neighbour cast's it light onto a cold November evening. 1/13th Sec at Iso 100 has captured some lovely detail. Despite being only a few degrees above the horizon. I have removed the atmospheric colouring and returned the image to black and white. I have just had a thought here is the original pic too. I think it takes a more romantic quality in B&W. Which one do you prefer?.
Labels:
The Moon
Saturday, 19 November 2011
First Light M1
It has been a long time waiting. But here it is first light from the new Hills Observatory. I thought I would pay homage to Messier's no 1 in his collection of fuzzies to avoid the great Crab Nebula M1. The last two nights have been clear if somewhat damp. A good test or the new home of my scopes. Water has been dripping off the outside of the dome and the grass is soaked you can feel the damp in the air. But I still wanted to have a play. The observatory has worked incredibly well no damp on the internal walls or inner dome. Now moisture build up on the mount or Pier. The optics remained clear too. I didn't even power up the dew heaters. So here is the pic. A wide field shot of M1 in all its glory. A 3 hour guided exposure over 2 nights of 2.5 minute subs at ISO 800 Dark's subtracted. I will do a series of flats over the weekend and re post if I get an improvement. Let me know what you think.
Labels:
Crab Nebula,
M1
Thursday, 3 November 2011
"Ordo Ab Chao"
Well folks the time has arrived the observatory is complete. It has taken four and a half months of hard work. Sorry about the delay in posting I have been a little greedy on the overtime at work managed to do over 120 hours in the last few weeks. Katie is surprised I even know where I live. The kids only recognise me from the family pictures on the wall!!!!!
A few friends have asked was it a tough project. Answer no not really the only difficult part has been not having a workshop to allow me to continue working when the weather changed which it did frequently. Covering and unplugging power tools packing them away wasted time. I have learnt numerous new skills including routing, fibreglassing. Oh and the Maths required to work out all the dome sections I thought I had long since forgotten.
My club www.brecklandastro.org.uk
has asked me to do a membership talk on the construction I am looking forward to presenting in January.
I has been a really great experience and the title of this post says I think I have achieved Order From Chaos If anyone has any questions please feel free to message me and I will be glad to offer any assistance.
I hope you have enjoyed following the build and I am looking foward to posting first light.
Labels:
Hills Observatory
Just a few more things to do
I have the skirt in place. I used 4mm ply to give a good strenth and supported also by two layers of fibreglass, I will give at least one gel coat tomorrow and get a picture done.
I also continued work on the main shutter, I have added a bit of weight with 2 coats of fibreglass aswell as overlapping seams to go around the corners. I also have fiitted the roller wheels. An ingenious idea that was made possible by a local company. I have also fitted the front and backstops for the main shutter and a long hook allows and simple opening mechanism without too much fuss. Today also allowed me to add a few security features for which I wont go into detail but it does stop the shutter being removed from the outside as well as stooping gusts of wind to ripping it off. Bolts are also positioned to stop unwanted rotation when not in use. And the inside of the dome got a coat of black paint. My daughter has a few of those glow in the dark stars on her ceiling and has donated some for me to add to my ceiling when complete.
I took a pile of scrap wood to the dump today and a chap next to me was dumping the cut off carpet he had spare he kindly let me have it and that was laid this afternoon along wit a good quality underlay. Now the shutters are in place I have installed the scopes, balanced and realigned them. Numerous power supplies and leads have been cable tidied.
Labels:
Hills Observatory
Friday, 30 September 2011
Up, Up and away
The time has come and that horrible feeling in my stomach has returned. Have my measurements been accurate enough has my routing beed steady can I glue and screw a perfect circle. Will the fibreglass peel away the second we start to lift. Anyway my two neighbours are here and it now or nothing. I am going to look and feel so stupid after all the banging and noise they have had to put up with.
1...............2...............3.............. lift.
It fits perfectly.
I cannot believe how far this project has come along and how proud I am of my achievement.
I still have not finished the main shutter so I have covered it till my next day off. I have also added a very temporary skirt to keep things water resistant. The small hinged door is also to be completed before I can say I am done. But for today I am one very happy chap.
Labels:
Hills Observatory
Fibreglass.
It has taken me two and a half days to give a couple of coats of matting and to help with a smoother finish I have laid the tissue paper matting on top. This pic shows the first of two coats of gel coat with the missing part at the bottom as I have decided to add the skirt after the dome is in position. There are a few lumps and bumps that can be sanded back quite easily. Looking good I think?
Labels:
Dome,
fibreglass,
Hills Observatory
Thursday, 22 September 2011
Dome ready for Fibreglass
Shame you can't see the grin on my face at this moment.
Labels:
Hills Observatory
Friday, 16 September 2011
Slowly Slowly the work progresses
Labels:
Dome,
gores,
Hills Observatory
Monday, 12 September 2011
Miracle it hasn't rained today
I said yesterday I wont hold my breath for a good day. Maybe I did but didn't know it as despite all weather reports today we have not had a drop of rain. The wind is very strong though we are getting the tail end of Hurricane Katia. As you can see progress has been made today I have completed all the arc sections. Last piece to do is the shutter sections. There will be a hinged shutter piece at the bottom the will drop down when required, the sliding section will roll back to the backstop of the shutter opening there will be an overlap to stop the ingress of water.
You will see what I mean
when they are done.
But for now it is time to baton
down the hatches and try and
protect my work from the
unrelenting power of Katia.
Labels:
Dome,
Hills Observatory
Bloody weather
All I seem to do these last few days is dodge showers. As I have no workshop to work in I am constantly covering things up and unplugging extension leads. When I do get a few minutes I have managed to install a first of the arcs and hope to get them all done and finished tomorrow, amidst dodging yes more showers. I am not holding my breath for clear skies.
Labels:
Hills Observatory
Saturday, 10 September 2011
Taking Shape
Hi everyone. Have been a little busy at work for the last week but this weekend is my weekend off. Spent the morning in Norwich buying curtains and insulating liners aswell as roman blinds for the doors and windows in the garden room. Getting ready for the winter. Which leads me back to the observatory. Had a few hours this afternoon and with a few extra helping hands, thank you Katie and Erin for your assistance in holding things steady. I have managed to get the two main arches in place and level and temporarily secured with some batons. Pic 2 gives a close up of the secondary arch that will be cover in hardboard ready for the fibreglass, and of course the upper arch will allow for the shutter to run on a smooth and true path backand forth. Hopefully tomorrow I can get the rest of the arcs cut and have myself a dome. If I say so myself this is looking fantastic. First light will be a momentus occasion. I hope I am inspiring a few to have a go too. You can do it I am not an engineer and using just the normal domestic tools in my back garden. Give me a shout and send me a link to your ideas and constructions. ( I was going to say erections but I wont) Ha ha.
Labels:
Hills Observatory
Friday, 2 September 2011
Polar Alignment
Labels:
Hills Observatory,
Pier,
Polar alignment
Wednesday, 31 August 2011
Pier pressure
Have been recovering in bed from a broken back. Not really. Here are the before, during and finished pics of my behemoth of a pier. Having moved it from observatory to shed for prep work and priming. I dont intend moving it again until it is installed permenantly.
The weather has not been very kind today.
So I just wanted to get a quick pic with the first of the two final coats of gloss black. Dark clouds has hindered progress. I also took the opportunity to mount the top plate. My LXD 75 mount will be attatched to this piece.
The weather has not been very kind today.
So I just wanted to get a quick pic with the first of the two final coats of gloss black. Dark clouds has hindered progress. I also took the opportunity to mount the top plate. My LXD 75 mount will be attatched to this piece.
Labels:
Hills Observatory,
Pier
Tuesday, 23 August 2011
The pier
What phrase is it the kids are using these days OMG. I think that sums it up.
Today I looked rather suspicious in the car park at work doing what looked like a dodgy deal from the back of 2 open car boots. Let me put your minds at rest. I havent turned to the dark side but I was collecting the custom made pier made by a work colleague Nathan.
Taking us both to lift it in to my car I rushed it home. I had to wait though till I got home this evening to get it out from the dining room floor and into position. I just had to know if it fits.
Oh My God it's huge. It's heavy and a hernier later lifting it on, yes it fits perfectly onto 3 feet of cured concrete. From the state of the weather forecast It may not be till next week until I can get the scope attatched and do a polar alignment. But for this minute I am one happy man. It will get several coats of primer and a nice Glossy black finish before it takes up permanent resisdence at the new Hills Observatory. (I am sure you can picture the huge smile on my face as I typed this tonight)
My sincere thanks Nathan for a fantastic job. Our best wishes, thoughts and prayers go out to you and your family at this time.
Labels:
Hills Observatory,
Pier
Tuesday, 16 August 2011
Looking Good
THE DOOR. A few days ago Tony our chairman from our society Breckland Astronomical Society delivered and installed the steel door. He had to make a small alteration to the frame as it was just off square. Fits like a glove and now has 2 coats of red oxide primer. The inside has been painted black and the front hopefully today will have the first of its gloss white coats to match the siding.
Yesterday I received a text from Nathan to inform me the pier is now ready for collection. Cant wait to see it and get it up for a test run. Pics to follow soon I promise.
Labels:
Breckland AS,
Hills Observatory
Thursday, 4 August 2011
Dome ring
Tues 2nd What a lovely few days of sunshine we have had apart from the freak downpoor this morning. Time well spent in finishing off the interior. The pier base is totally isolated from the observatory and my steel pier is currently under construction from Nathan a welding tutor where I work. I cant wait to see it.
Probably the only tool I do not own is a router and a fellow Breckland Astronomical Society member Barry has lent me his. I have used 12mm external grade ply and carefully cut out the ring that will fit to the top of the walls I built a little jig and used a steel plate with a 4.5" gap to give a consistent sizing of the pieces cut. The castors will be mounted ontop of each upright so distrubuting the load quite effectively. I have cut 10 pieces that will be glued and screwed to give be a firm base ring on 24mm. Haven't taken a pic of a pile of arc sections but all they need is a sanding before construction. Unfortunately I am working now till next monday so a new set of pics to follow soon. Please feel free to comment or ask me any questions. Cheers.
Labels:
Hills Observatory
Insulation and flooring
It has been a good week since anything has been done. A few well deserved days off work has allowed me to crack on. I have used 50mm Polystyrene insulation in the wall cavaties and under the floor as well as some security measueres to give added protection. This gave me the opportunity to install the cables to the light fittings, switches and get the heater cables and enough mains sockets for future add ons!!


Loft boards were used for the flooring and a layer of hardboard for the inner walls. All will be painted black in due course. A fellow society member Tony Fox Carter is currently making me the steel door similar to the style that graced my previous observatory. Probably overkill but security is my business and it never pays to cut corners on what is the most vulnerable part of the structure.
Labels:
Hills Observatory
Friday, 15 July 2011
Cladding
To my surprise the cladding arrived this morning and not Saturday as arranged (not complaining). So another chance to get on, 5 sides have been done. Very simple to do just attatch the end strips and slide the 300mm pieces in, therefore aligning perfctly with the top that will soon support the fixed ring. I have also battoned at each 300mm intersection to provide additional strenth and support.I am nearly ready for a fellow society member Tony to measure up for the steel door. He is the same chap who made the door for the last observatory. The doorway in will be on the left side nearest the fence (north facing) this affords easy acces when scopes are parked.
Labels:
Hills Observatory
Framework
The wind was a bit fierce and luckily the rain cleared to allow long enough for me and my daughter to get the framing up. It gave her 40 minutes away from essay writing so I think she didn't mind helping. So what have we got I decided that the observatory would be hexagonal in shape. I have used 3" x 2" for the general structure and used the same for the flooring, once. Not a bad morning's work. Apologies to "Nutty" and "Jack" I had arranged to get a days golf in today but the bad weather has left me a little behind schedule. I have the cladding coming tomorrow for the exterior sides so todays job is to cut the batons and to get rid of the rubbish.
Labels:
Hills Observatory
Subscribe to:
Posts (Atom)


